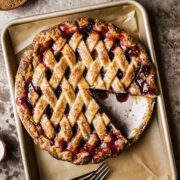
Cherry Rhubarb Pie
This pie has an easy, flaky all-butter crust and a sweet, jammy filling with the fresh, vibrant flavors of cherries and rhubarb. This is a pie for fruit lovers who want the essence of the ingredients to shine through. Serve with vanilla ice cream or sweetened whipped cream for a lovely balance of tart and sweet.
Servings 1 9 inch pie
Equipment
Ingredients
All Butter Pie Dough
- 15 mL vinegar chilled
- 60 mL water chilled
- 300 grams all purpose flour
- 1 teaspoon kosher salt Diamond Crystal
- 226 grams unsalted butter in ½ inch cubes, chilled
- 1 large egg for egg wash
- 5 mL water for egg wash
- 24 grams Turbinado sugar to sprinkle on crust before baking
Cherry Rhubarb Pie Filling
- 450 grams cherries pitted
- 244 grams rhubarb cut in ¼ inch pieces
- 30 mL lemon juice
- 40 grams tapioca flour also called tapioca starch
- 200 grams granulated sugar reduce to 150g (¾ cup) if using sweet cherries
Instructions
ALL BUTTER PIE DOUGH
- Place vinegar and water into a small cup in the freezer to chill.15 mL vinegar, 60 mL water
- In a large bowl, combine flour and salt with a whisk. Add cubed butter to the flour mixture and toss to coat butter pieces.300 grams all purpose flour, 1 teaspoon kosher salt, 226 grams unsalted butter
- Using your fingers, squeeze each cube of butter to flatten it into a wide, thin layer. Continue to toss flour mixture with butter to make sure it's coated.
- Continue cutting butter into flour mixture (with your hands or a pastry blender) until the butter is in flattish, pecan-sized pieces.
- Form a well in the center of the dry mixture. Pour in chilled water and vinegar. Using a bench scraper or a heavy spatula or wooden spoon, push the mixture back and forth until the liquid has been absorbed into the dry ingredients. Using your hands, lift the edges of the rough dough mass, turn them inwards and press them firmly down. Repeat this, turning the bowl, until you can gather the dough into a rough ball, and there are no loose pieces at the bottom of the bowl.
- On a work surface, divide dough into two equal pieces and flatten each into a disc. Wrap tightly with plastic wrap and chill in the refrigerator for at least 30 minutes.
- Remove both discs of dough from the fridge and let rest for about 15 minutes. On a piece of lightly floured parchment paper, roll one disc into an 11 inch diameter circle. (Roll the dough out by placing the rolling pin in the center of the circle and firmly pressing down while moving the pin towards the outer edge of the dough. Turn the dough clockwise 90 degrees and continue this process of rolling and turning until the dough forms a circle approximately 10 inches in diameter. Use a bit of flour as needed to keep the rolling pin from sticking.)
- Lift dough onto your 9 inch pie pan. Center it carefully, pressing down into the base and corners to be sure there are no air pockets trapped underneath. Trim the outer edge so that it uniformly overlaps the edge of the tin by ½ inch. Wrap in plastic wrap and place into the refrigerator to chill.
- On a piece of parchment paper, roll the second disc of dough into a circle 10 inches in diameter. Using a knife and a ruler, cut lattice strips in ¾ inch widths. Transfer the strips on the parchment to a baking sheet, cover with plastic wrap and place in the fridge to chill.
CHERRY RHUBARB PIE FILLING
- In a large bowl, combine sour cherries and diced rhubarb. Add lemon juice, sugar and tapioca flour. Fold ingredients together gently until completely blended. Let sit for 15 minutes to thicken slightly.450 grams cherries, 244 grams rhubarb, 40 grams tapioca flour, 200 grams granulated sugar, 30 mL lemon juice
PIE ASSEMBLY AND BAKING
- Scoop pie filling into dough-lined pie pan, leaving extra liquid in the bowl.
- For diamond lattice, evenly space half of lattice strips along the top of the filled pie. Fold back every other strip. Place a strip in the center of the pie at a 45 degree angle to the first strips, forming an X shape. Unfold the folded strips, covering the most recently placed strip. The holes between lattice should form a diamond pattern.
- Repeat this under/over weaving procedure on either side with the remaining strips of dough until you have a fully woven lattice crust. If this seems complex, refer to my detailed post on how to make lattice crusts for additional instruction.
- Trim the edges of the lattice so that they just meet the inner edge of the pie tin. Fold edge of bottom piecrust down under itself to create a double layer at edge of pie pan.
- Crimp the pie crust. In a small bowl, beat egg with water and brush the lattice and crust with egg wash. Sprinkle with turbinado sugar. Place in the refrigerator to chill for 30 minutes.1 large egg, 5 mL water, 24 grams Turbinado sugar
- Preheat the oven to 400 degrees and position a rack in the lower third of the oven. Line a rimmed baking sheet in aluminum foil (to catch any spills) and place on the lower rack to preheat.
- Place the pie on the hot baking sheet and bake for 50-60 minutes, or until top crust is golden brown and juices at center of pie are bubbling (not just at the edges). At about the 30 minute mark, gently tent pie with aluminum foil to keep top crust from browning too much. Remove from oven and place on a metal rack to cool completely. Pie should be fully cool before slicing to ensure fruit filling has gelled.
- Serve individual slices with sweetened whipped cream or a scoop of vanilla ice cream.
Notes
- Fruit choice: Feel free to use either fresh or frozen fruit for this recipe. If using frozen, be sure to fully defrost and drain any excess juices before mixing the filling to avoid a watery pie.
- Cherries: If you can’t find sour cherries, regular sweet cherries make a good substitute. You can keep the sugar amount the same or reduce it to 150 grams (¾ cup) if you prefer a less sweet filling.
- Tapioca flour: Tapioca flour is recommended for thickening the filling because it creates a clear, glossy gel. If you can’t find tapioca, substitute with half as much cornstarch (about 20 grams or just under 3 tablespoons). Note that cornstarch will cause the filling to look cloudy when it thickens.
- Butter temperature: Use cold butter when making the pie dough. Cold butter creates flaky layers by staying in small pieces throughout the dough, which steam during baking. Avoid letting the butter warm up or melt.
- Handling the dough: Mix the dough just until it comes together—overworking it develops gluten and can make the crust tough.
- Chilling the dough: Chill the dough before rolling it out and again after assembling the pie. This relaxes the gluten and helps prevent shrinking or misshaping during baking.
- Resting the filling: After mixing the fruit and thickener, let the filling rest for about 15 minutes. This gives the tapioca starch time to start thickening the juices before baking.
- Draining excess juices: Especially when using frozen fruit, drain any extra liquid from the filling before adding it to the crust to prevent a runny pie.
- Baking setup: Bake your pie on a foil-lined rimmed baking sheet. This catches any drips and makes cleanup easier.
- Baking doneness: Bake until the filling bubbles in the center, which indicates it’s fully cooked and thickened.
- Cooling time: Let the pie cool completely before slicing. Cooling allows the filling to set properly and prevents it from running out when cut.
- Store: After baking, let the pie cool completely. Wrap tightly in plastic wrap and store at room temperature (if not in a hot climate) for up to 2 days, or refrigerate for up to 5 days.
- Freeze: To freeze a baked pie, wrap it tightly in plastic wrap and foil. Freeze for up to 2–3 months. Defrost overnight in the refrigerator before serving.