
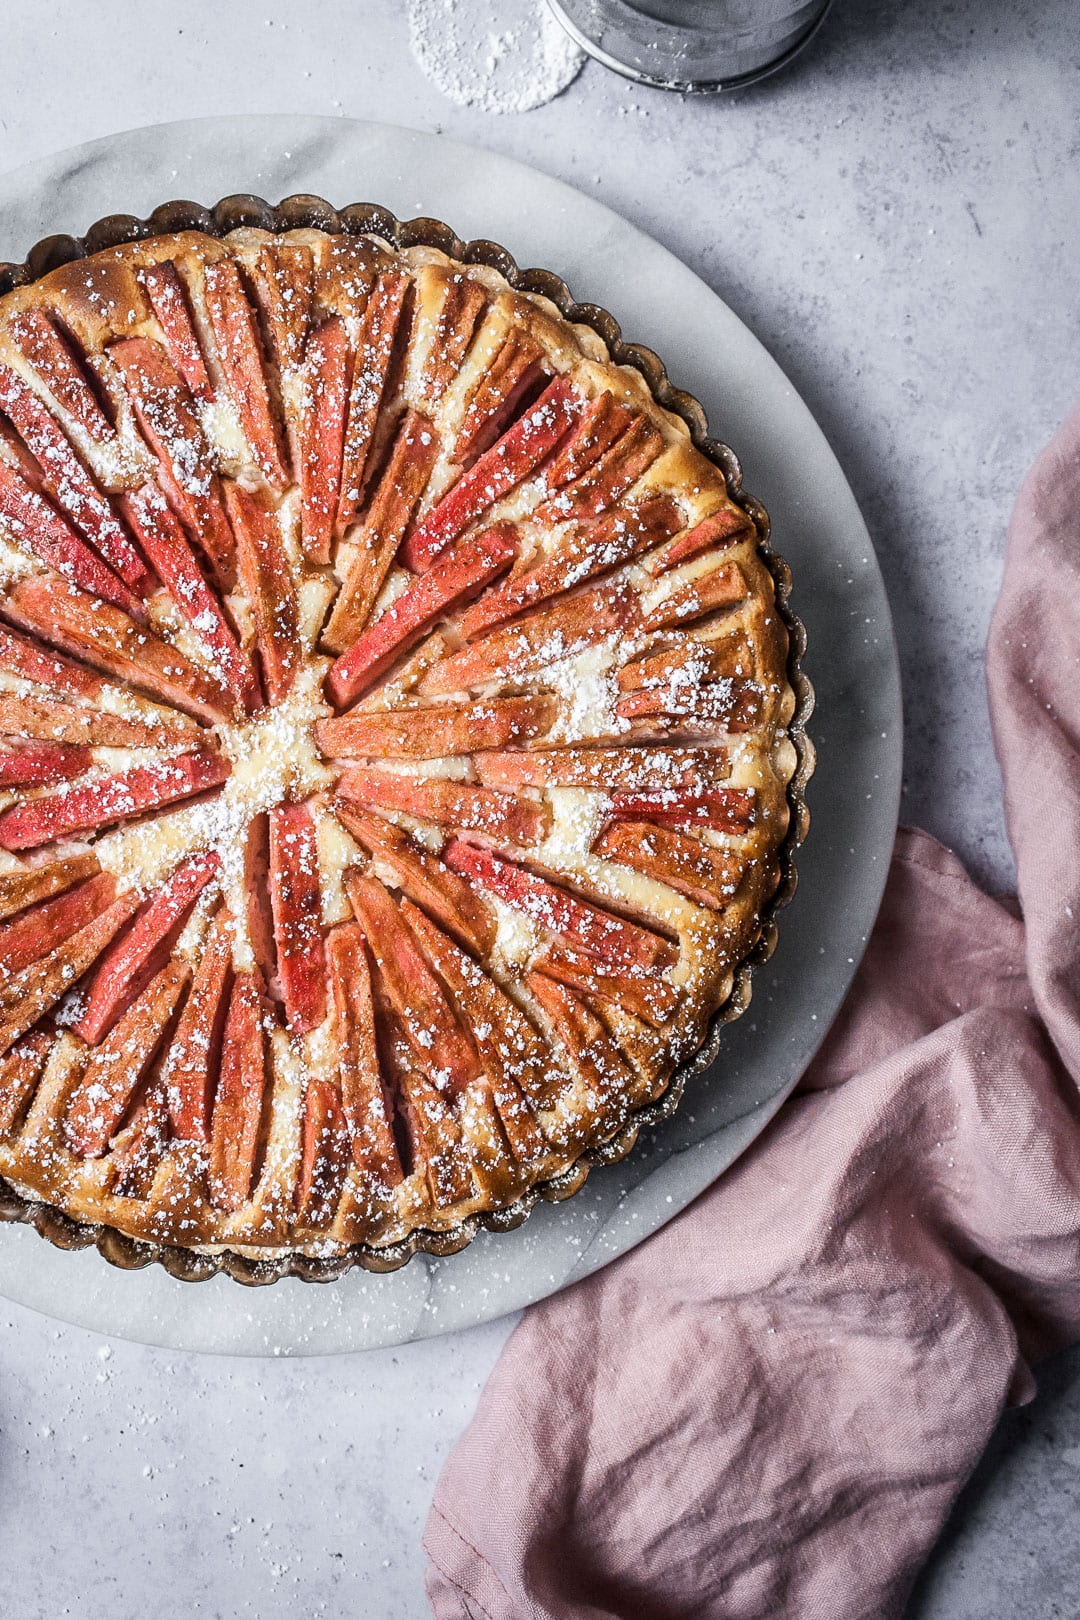
I want to share this recipe with you while apples are still crisp and fresh. The beauties that I used in this recipe are an heirloom variety I found locally called the Mountain Rose. The other gorgeous pink apples I've seen include Hidden Rose and Pink Pearl.
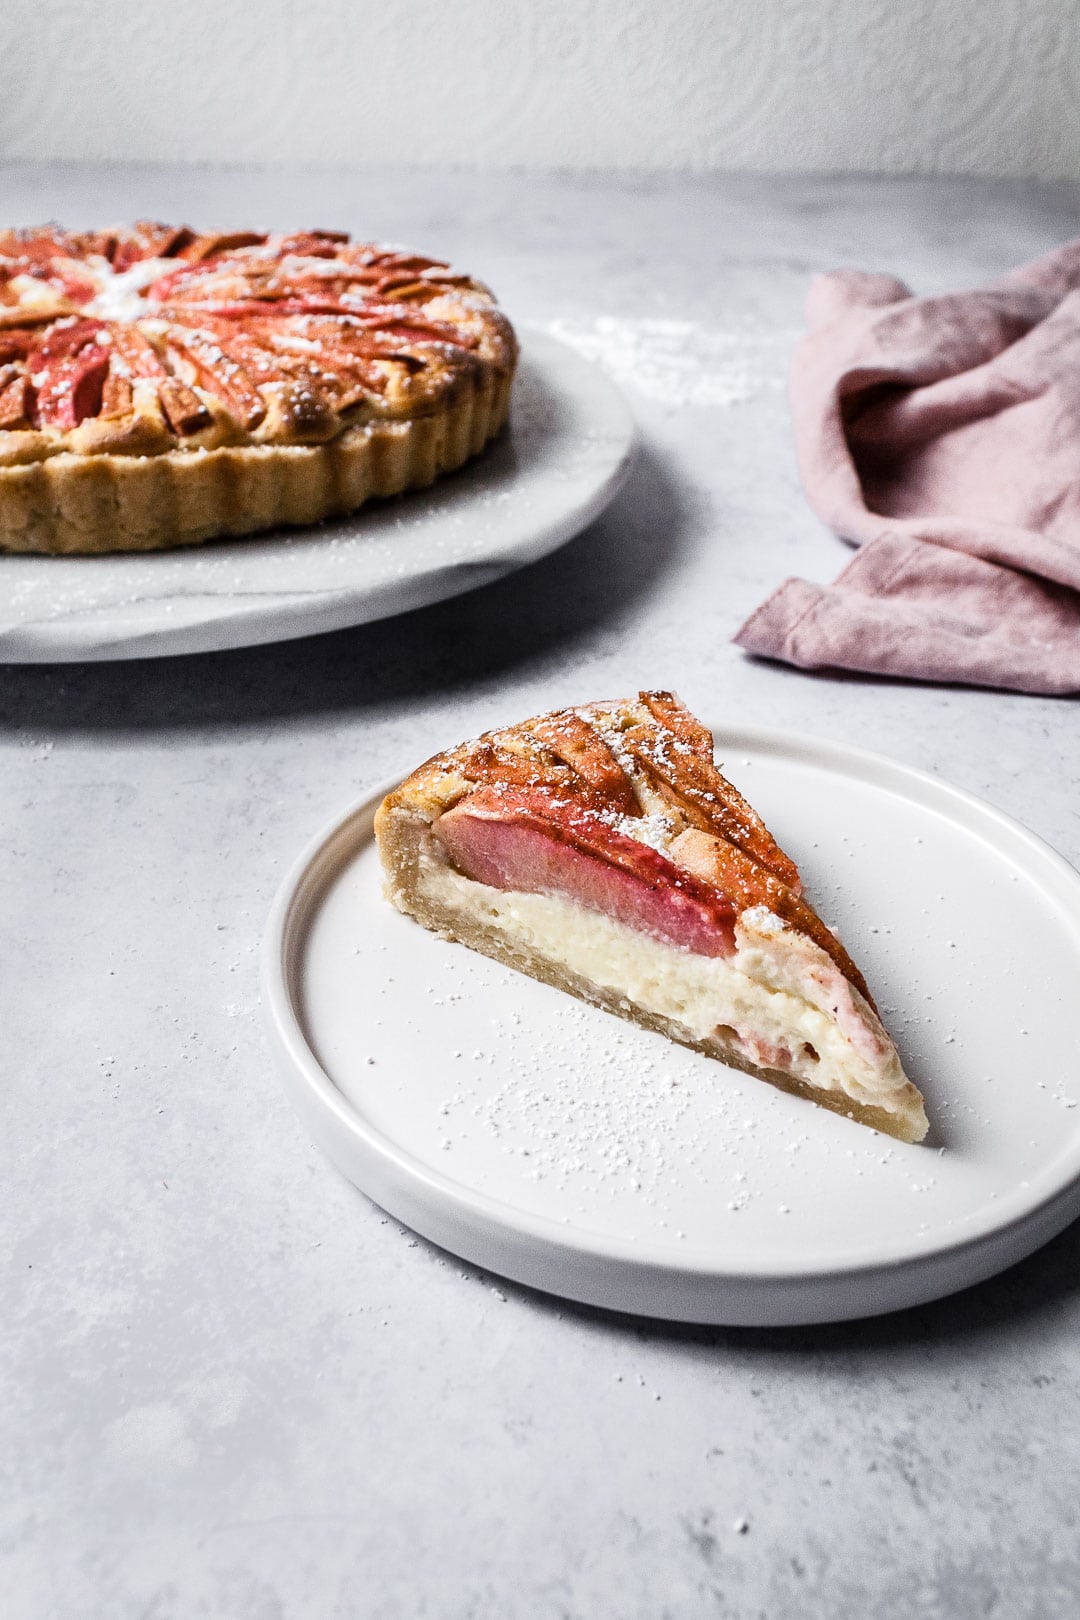
No matter what you call them, they're magical to use in baking. Unassumingly light green on the outside, they hide a sweet tart interior that is bright pink. A bonus I discovered while making this tart is that the apples didn't brown after peeling them - no need to treat them with lemon juice! The pink color remains present after baking, so you don't lose any of the drama when it comes out of the oven.
Now that I've gone on and on about these apples, I want to make sure you know that the tart is delicious and will be beautiful with ANY type of apple that you have on hand. The pink does make for a unique presentation, but don't feel like you should pass this up because your apples are just the standard apple color inside. The spoke-like arrangement of the slices on the cream cheese filling is a big part of the drama. And a dusting of powdered sugar can't help but dress it up further.
This tart, which uses the filling from a Land O' Lakes recipe, combines a shortbread crust, sweet cream cheese filling, and cinnamon sugar tossed apples into a wonderful fall treat that's worthy of a spot in your holiday baking lineup.
Speaking of holiday baking, there's also apple ginger mini cakes with salted caramel sauce. Or if you're more of a pie person, you could try a fancy crust using my lattice pie crust tutorial.
Love this recipe? Please leave a comment and star rating. ★★★★★ Your feedback, suggestions, and adaptations are very helpful to other bakers!
📖 Recipe

Bavarian Apple Tart
INGREDIENTS
TART CRUST
- 2 cups all purpose flour
- 2 tablespoon granulated sugar
- ½ teaspoon salt
- 10 tablespoon unsalted butter, chilled, cut into cubes
- 4 - 6 tablespoon ice water
CREAM CHEESE FILLING
- ½ cup sugar
- 16 oz cream cheese , room temperature
- 2 large eggs, room temperature
- 1 teaspoon vanilla extract
APPLE TOPPING
- 4 cups apples, peeled, quartered and sliced into crescent shapes
- ⅓ cup granulated sugar
- ½ teaspoon ground cinnamon
- ½ teaspoon ground nutmeg
- ⅛ teaspoon ground cardamom
- powdered sugar, for dusting on top of tart
INSTRUCTIONS
TART CRUST
- In a large bowl, measure out flour, salt and sugar. Whisk together to ensure ingredients are well distributed and there are no lumps.
- Add cubes of butter and toss well to cover with flour. Using your hands or a pastry blender, cut in the butter until it has the texture of coarse cornmeal.
- Add the ice water gradually, kneading it into the dough until it begins to come together. Add just enough water to create a smooth dough - it should not be terribly dry and crumbly, nor should it be gooey or tacky. (I sound a bit like Goldilocks - only add the water until it's juuuust right. Don't worry - you're doing a great job.)
- Form the dough into a disc and wrap tightly in plastic wrap. Refrigerate for at least an hour, or overnight.
- When you wish roll out the dough, remove it from the fridge and let it warm up slightly, approximately 10-15 minutes.
- On a lightly floured surface (or between two sheets of parchment paper), roll the dough into a circle with a diameter of approximately 12 inches - one inch wider than the tart pan on each side. You can place the pan on top of the rolled out dough to double check sizing.
- Roll the dough onto the rolling pin and transfer it to your 10" tart pan. Using your fingers, gently lift the edge of the dough up while pressing the base into the corner of the pan. You want to make sure the dough is pressed in and does not gap where the tart pan base and side meet.
- With a sharp knife or kitchen scissors, trim the dough so that there is an even overhang all around - about 1 inch. Fold the excess dough out and down and under so that it slides down on the interior side of the pan; you're basically doubling the thickness of the sides, while hiding the rough edge between the dough and pan.
- Press the dough against the sides to even out and make sure the dough is flush with the pan.
- Using a sharp knife, trim the excess dough by cutting horizontally along the top of the pan. I used the back of a knife blade pressed into the top edge at a slight angle to add a bit of visual interest to the crust.
- Place the pan in the freezer for at least an hour so that it is firm and does not slump during baking.
- Preheat oven to 375 degrees.
Crumple a sheet of parchment paper to make it more flexible, then smooth and place in base of crust. Fill with dried beans to keep the dough in place as it bakes).
Bake for 15 minutes, watching carefully to make sure the edges do not begin to brown. - Remove the pan from the oven. Carefully lift off the parchment paper and beans and place back in the oven for approximately 3 minutes, until just starting to brown slightly.
- Place the crust on a rack to cool completely before adding cream cheese filling and apple topping.
CREAM CHEESE FILLING
- In the bowl of a stand mixer fitted with the paddle attachment, mix the cream cheese and sugar on medium-low speed until well combined. Scrape the sides of the bowl with a spatula to assure the sugar is evenly blended.
- Add eggs one at a time, beating well to incorporate. Add vanilla and mix to combine.
- Pour cream cheese mixture into parbaked tart shell and smooth with an offset spatula.
APPLE TOPPING
- Preheat oven to 375 degrees F.
- In a large bowl, gently mix the apple slices with the sugar and spices together with a spatula, folding carefully so that the apples do not break.
- Starting at the middle of the tart and working your way out, place the apples one by one into the cream cheese filling with the narrower interior side of the apple slice facing down into the filling and the wider exterior of the apple facing out. If one end of the apple is wider than the other, place the wider end towards the outside. (Think of the way a flower petal on a daisy is narrow at the center and wider at the outside).
- Place the apple slices in concentric circles until you reach the exterior edge of the tart. See images of the unbaked tart for reference in placement.
- Bake for 55-60 minutes, or until the center of the tart is almost set. Cool on a rack.
- Remove the tart from the mold and place on a serving platter. Dress it up with a dusting of powdered sugar: spoon some powdered sugar into a fine-mesh sieve and VERY gently tap it against your hand while holding over the tart.
Emily says
Beautiful! I want to make this for Christmas dinner and have a few questions 🙂 I'll be doing a lot of other cooking the day of Christmas, is their a good way for me to make it a day early and store it? Would you need to warm it up again in the over or would it taste good cold? Or could I possibly even just cook the crust and mix together the fillings and apples and then put it all together and cook it when we're ready to eat it? I'm much better at cooking than baking, so any tips on this would be much appreciated 🙂 Thank you!
The Floured Table says
Hi Emily! Thanks for your thoughtful questions. Breaking it down into steps is definitely possible - I do that all the time and it really makes a big difference. For this recipe, I think it does taste best slightly warm and the same day it's baked. I would recommend two things that you could do in advance to cut down on baking time the day of: Mix up your tart dough a day or two in advance and keep well wrapped in the fridge. You could even roll it out and have it ready to go in the tart pan in advance. You can also pre-measure and mix together the sugar and spices for the apple filling. Since you're only slightly par-baking the crust before adding the filling, it wouldn't work as well to try that the day before. The cream cheese filling comes together really easily. Peeling the apples and placing them is really the most time consuming part! Wishing you a wonderful Christmas dinner!
Emily says
Thank you for the advice, it turned out AMAZING! I got a lot of compliments. Great recipe and great post! Only wish I could've gotten a hold of the pink apples in my area and it would've been perfect 🙂
The Floured Table says
This makes me SO happy! Thank you so much for taking the time to share your results, Emily.
x
Kathleen
Renée says
Those Pink apples are beautiful, they are usually only available for a hot minute in the Northeast, Of course, I missed them this year at my Greenmarket. Luckily I can eye your beautiful tart and more here on your very lovely blog...X
The Floured Table says
Thank you so much, Renée! It's the first time I've found them here as well. It appears that the variety originated here on the West Coast -presumably that makes it easier for me to source them locally. There's something magical about slicing into one - pale green with a light blush on the outside, and then the reveal of that amazing pink interior!